Avoid Using The Green “A” Setting On Your Camera Dial – It’s OK To Turn The Dial
If you own a DSLR or Mirrorless Camera with a green button, you are doing yourself and your photography an injustice by leaving the dial set to green all the time. Don’t be afraid to explore what the settings can do for you. It’s the digital age of instant results vs. 1982 when I started and had to wait days to see my results in prints.
In this post, I will not cover every dial setting, but I will cover the primary options on most cameras that allow for more control.
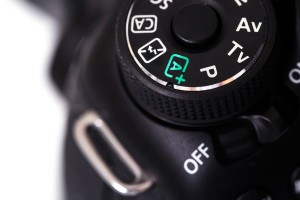
A = Auto or Automatic – The Camera controls everything. This is the most restrictive setting on the dial for the user which means the user is bowing down to the camera. Avoid this setting like the plague and use P instead.
P = Program Auto Exposure – This setting allows the user to have more control. As a beginning photographer, this is s good setting to start with initially as you learn more about other settings on the dial. Be sure to pay attention to what the camera is choosing based on various scenes. This can help in the learning process. As a professional, it’s rare that I shoot set on P, but I have used it on occasion when it seemed right for what I wanted to accomplish.
TV = Shutter Priority – With this setting, the user can set both ISO and Shutter Speed. The camera decides what aperture ( lens opening like f/5.6, f/11, etc.) to set based on the shutter speed chosen and the ISO setting. This mode is good when the shutter speed may be more important than what aperture is being automatically selected by the camera. For example, stopping action by shooting at 1/2,000th of a second and letting that be the focus rather than the aperture setting.
___________________________________________________________________________
As a professional photographer, the next two are my favorite settings to use regularly.
AV = Aperture Priority – Like TV, this setting allows the user to set ISO, but instead of shutter speed, this setting is based on the aperture ( lens opening like f/5.6, f/11, etc.). This is a setting that I use a lot when I’m outside. I like being able to control my depth of field by just setting AV to say f/5.6 (depending on the lens) and letting the camera select the correct shutter speed. Depending on the lens that I’m using like my 70-200mm f/2.8, I’ll get a nice shallow depth of field having it set at f/5.6. This is a mode that I recommend experimenting a lot with.
M = Manual (Not Pictured – But Right After AV) – This setting is one that a lot of new photographers fear. As a professional, I can honestly say that MANUAL is not right for every scenario. I definitely use manual a lot of the time when shooting inside. It gives me full control over everything and I actually have to think about what I’m doing from time-to-time. Like AV (above), this is a mode that I recommend experimenting a lot with.
If you enjoyed this post, please use the social icons below the share it.
David Williams
Latest posts by David Williams (see all)
- 5 Signs You’re Hiring the Wrong Photographer for Your Business - April 9, 2025
- How Will AI Change Professional Photography? - February 2, 2025
- Family Photographers vs. Commercial Photographers: Exploring the Differences in Approach, Purpose, and Technique - February 2, 2025
- Black and White Film Shot Of Our Golden Retriever: Trigger - February 2, 2022
- North Carolina Snow Images Shot In Franklin County - January 22, 2022